


Nissan Qashqai e-POWER 2024 Owners Manual
7.3.1.2. Available views (models with 3D view)

The distance guide lines and the vehicle width guide lines should be used as a reference only when the vehicle is on a paved, level surface. The apparent distance viewed on the monitor may be different than the actual distance between the vehicle and displayed objects.
Use the displayed lines and the bird’s-eye view as a reference. The lines and the bird’s-eye view are greatly affected by the number of occupants, fuel level, vehicle position, road condition and road grade.
If the tyres are replaced with different sized tyres, the predictive course lines and the bird’s-eye view may be displayed incorrectly.
When driving the vehicle up a hill, objects viewed in the monitor are farther than they appear. When driving the vehicle down a hill, objects viewed in the monitor are closer than they appear.
Objects in the rear view will appear visually opposite compared to when viewed in the rearview and outside mirrors.
Use the mirrors or actually look to properly judge distances to other objects.
The distance between objects viewed in the rear view differs from actual distance because a wide-angle lens is used.
On a snow-covered or slippery road, there may be a difference between the predictive course line and the actual course line.
The vehicle width and predictive course lines are wider than the actual width and course.
Front and rear view

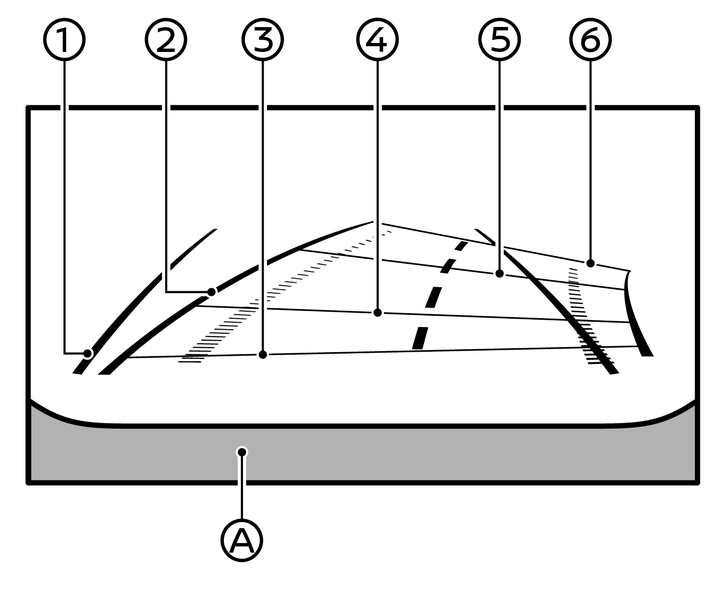
Guiding lines that indicate the approximate vehicle width and distances to objects with reference to the vehicle body line (A), are displayed on the monitor.
Vehicle width guide lines (1):
Indicate the vehicle width.
Predictive course lines (2):
Indicate the predictive course when operating the vehicle. The predictive course lines will move depending on how much the steering wheel is turned.
Distance guide lines:
Indicate distances from the vehicle body.
Red line (3): approx. 0.5 m (1.5 ft)
Blue line (4): approx. 1 m (3 ft)
Blue line (5): approx. 2 m (7 ft)
Blue line (6): approx. 3 m (10 ft)
The front view will not be displayed when the vehicle speed is above 20 km/h (12 MPH).
When the speed exceeds 20 km/h, (12 MPH) the screen switches to the Navigation screen (where fitted) and the display is restricted.
Bird’s-eye view

The bird’s-eye view shows the overhead view of the vehicle which helps confirm the vehicle position and the predictive course to a parking space.
The vehicle icon (1) shows the position of the vehicle. Note that the distance between objects viewed in the bird’s-eye view differs from the actual distance.
The predictive course lines (2) indicate the predicted course when operating the vehicle.
The amber markers (3) are displayed when the sonar is turned off or the sonar is not available at the corner.
Objects in the bird’s-eye view will appear farther than the actual distance.
Tall objects, such as a kerb or vehicle, may be misaligned or not displayed at the seam of the views.
Objects that are above the camera cannot be displayed.
The view for the bird’s-eye view may be misaligned when the camera position alters.
A line on the ground may be misaligned and is not seen as being straight at the seam of the views. The misalignment will increase as the line proceeds away from the vehicle.
Save Location (where fitted)
You can save the points where the front-wide view will automatically pop up when the vehicle is within approximately 30 metres (110ft) of a saved location. This can be useful when the driver needs to check the blind corners at road junctions with poor visibility for example.
To save a location, touch the Save location icon  (where fitted).
Front-side view
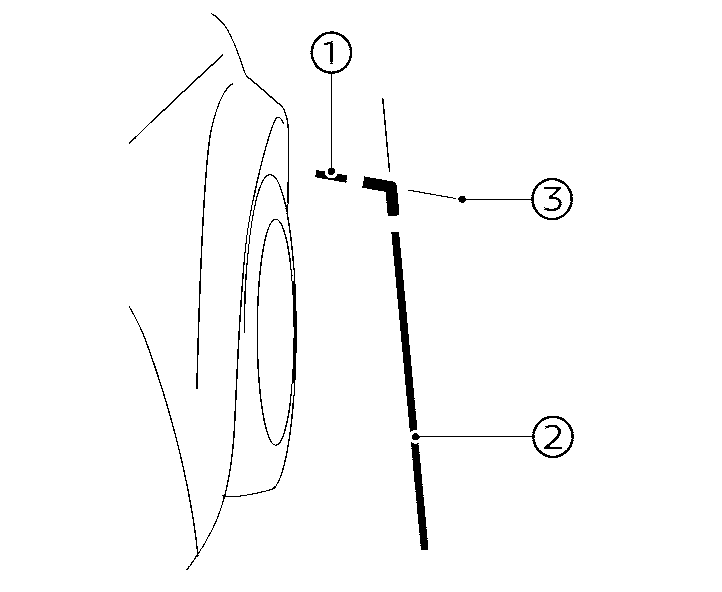
Guiding lines:
Guiding lines that indicate the approximate width and the front end of the vehicle are displayed on the monitor.
The front-of-vehicle line (1) shows the front part of the vehicle.
The side-of-vehicle line (2) shows the vehicle width including the outside mirrors.
The extensions (3) of both the front (1) and side (2) lines are shown with a blue line.

The turn signal light may look like the side-of-vehicle line. This is not a malfunction.
Front-wide/rear-wide view
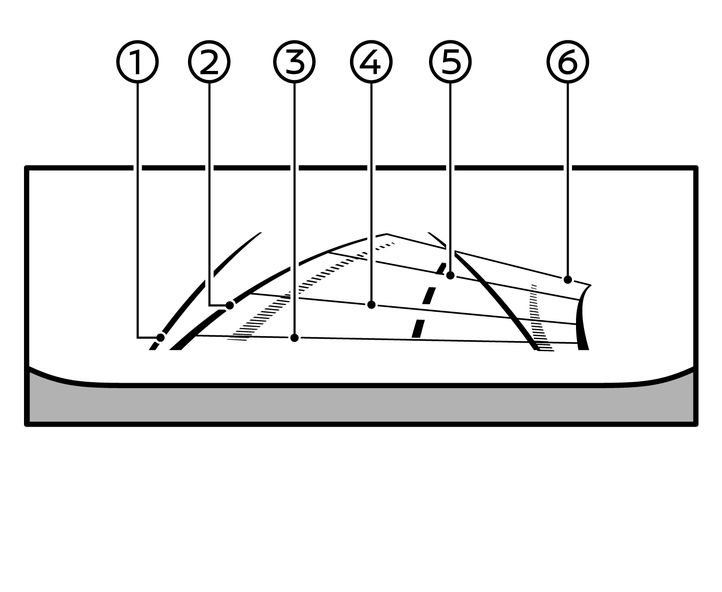
While the front view/rear view shows a normal view on the split screens, the front-wide view/rear-wide view shows a wider area on the entire screen and allows checking of the blind corners on the right and left sides.
Vehicle width guide lines (1):
Indicate the approximate vehicle width.
Predictive course lines (2):
Indicate the predictive course when operating the vehicle. The predictive course lines will move depending on how much the steering wheel is turned.
Distance guide lines:
Indicate distances from the vehicle body.
Red line (3) : approx. 0.5 m (1.5 ft)
Blue line (4) : approx. 1 m (3 ft)
Blue line (5) : approx. 2 m (7 ft)
Blue line (6) : approx. 3 m (10 ft)
The front-wide view will not be displayed when the vehicle speed is above 20 km/h (12 MPH).
When the speed exceeds 20 km/h, (12 MPH) the screen switches to the Navigation screen (where fitted) and the display is restricted.

When the monitor displays the front-wide view and the steering wheel turns about 90 degrees or less from the straight ahead position, both the right and left predictive course lines (6) are displayed. When the steering wheel turns about 90 degrees or more, the predictive course line is displayed only on the opposite side of the turn.
Rear zoom view (where fitted)
Rear zoom view shows an enlarged portion of the rear ground area. This provides a clear limited rear view with the predictive centre line, that can be useful when docking a trailer to the vehicle for example.
To disable or enable rear zoom view, when the camera screen is displayed, touch the rear zoom view icon  .
.
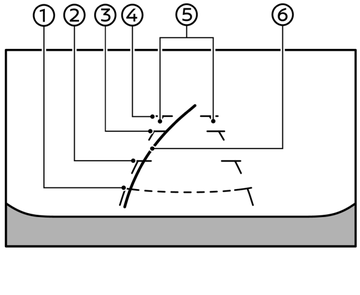
Invisible hood view (where fitted)
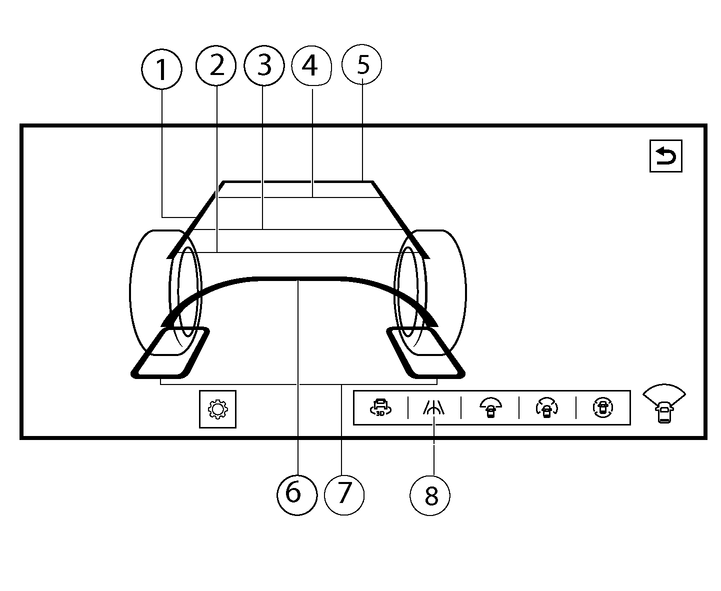
The invisible hood view allows the user to see the road surface under the virtually transparent vehicle body. This my be useful for aligning the front wheels with the rails of an automatic car wash, or to avoid hitting the side of the vehicle against kerbs when operating at low speeds, for example.
Touch the invisible hood view icon (8) to activate invisible hood view. The first image will be displayed after the vehicle has moved approximately 3 metres (10 feet). To deactivate invisible hood view, select another view.
The image of the road surface under the body is a composite from the front camera images, and does not actually show the road surface under the vehicle body.
Predictive course lines (1):
Indicate the predictive course when operating the vehicle. The predictive course lines will move depending on how much the steering wheel is turned. The predictive course lines in the rear view will not be displayed while the steering wheel is in the straight ahead position.
Distance guide lines (2) - (5) :
Distance guide lines:
Indicate distances from the vehicle body.
Red line (2) : approx. 0.5 m (1.5 ft)
Blue line (3) : approx. 1 m (3 ft)
Blue line (4) : approx. 2 m (7 ft)
Blue line (5) : approx. 3 m (10 ft)
Vehicle outline (6) :
Indicate the vehicle outline of the front area.
Wheel area lines (7) :
Indicate the wheel outlines of the front wheels.
Invisible hood view icon (8) :
Touch this icon to activate invisible hood view.
The invisible hood view will not be displayed when the vehicle speed is above 20 km/h (12 MPH).
3D view (where fitted)
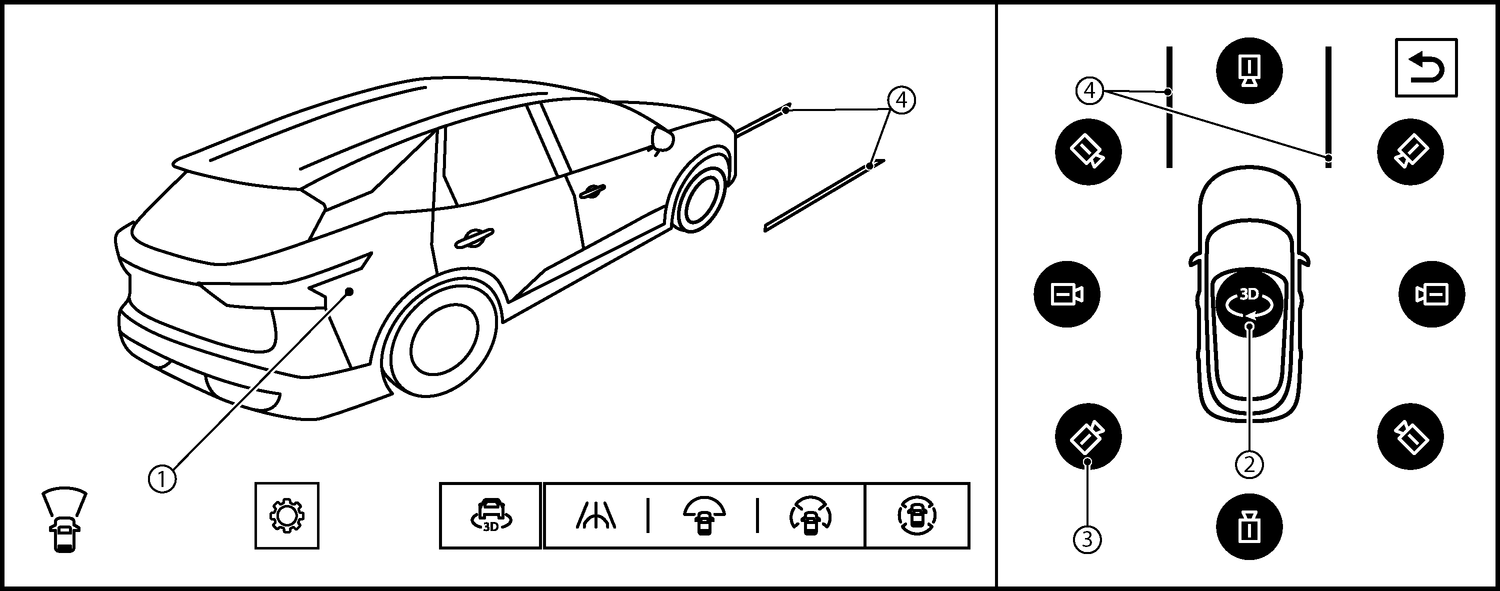
The 3D view shows the 360–degree view around the vehicle which helps confirm the vehicle position and the predictive course to a parking space. The 3D view is not available when R (Reverse) is selected.
The vehicle image (1) rotates by touching the rotation icon (2). When touching the rotation icon, the vehicle image and the surrounding area image will pop up and turn 360° to check the vehicle surroundings.
The vehicle image can also be rotated by swiping the vehicle image itself.
8 different camera directions can be selected by touching the camera position icon (3).
The predictive course lines (4) indicate the predicted course when operating the vehicle.
The distance between objects viewed in the 3D view differs from the actual distance.
There are some areas where the system will not show objects.For more details see
[Automatic 360° moving] (where fitted)
When you push the <CAMERA> button for the first time after the power switch has been placed in the ON position, the vehicle image and the surrounding area image will pop up and turn 360° automatically ([Automatic 360° moving]) to check the vehicle surroundings.
To disable or enable the [Automatic 360° moving] feature, when the camera screen is displayed, touch  to open the [Settings] menu. Then select [Automatic 360° moving] to enable or disable the feature.