Nissan LEAF 2023 Owners Manual
6.5.3.30. Trip computer

The trip computer display can be changed using the  or
or  and
and  or
or  buttons located on the steering wheel.
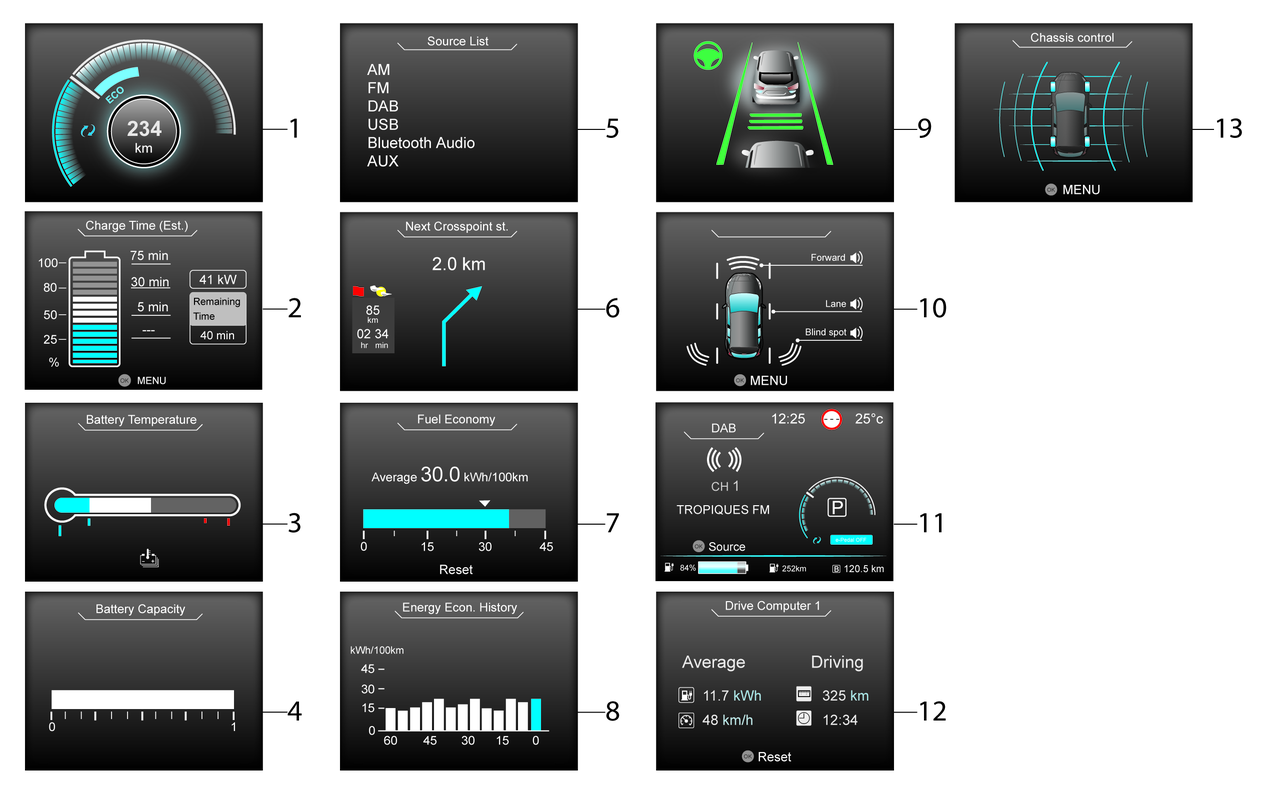
The following screens are available
Power meter
Estimated Charge Time
Li-ion battery temperature gauge
Li-ion battery capacity level gauge
Source List
Navigation (where fitted)
Energy Economy
Energy Economy History
ProPILOT Assist (where fitted)
Safety Shield (where fitted)
Status
Drive Computer
Chassis Control
Power meter
The power meter displays the actual traction motor power consumption and the regenerative brake power provided to the Li-ion battery while driving. See
.
Driving with the power meter gauge in the ECO zone helps reduce the energy consumption and extend the driving range. (The ECO zone varies depending on the vehicle speed.) The ECO zone is not related to the ECO mode which is activated by the ECO switch.
Estimated charge time
The Estimated Charge Time mode shows the estimated time to charge the Li-ion battery to a full level.
Immediately after the power switch is placed in the ON position, longer charging time may be displayed than the actual time required.
How to read the display


The displayed charging time is calculated based on the electrical power (supplied to the charger), which is selected in the [Charge Time Screen] setting under the EV Settings menu.
the display shows:
The currently remaining Li-ion battery charge level.
The estimated charging time to reach each percentage (25%, 50%, 80%, and 100%) of the Li-ion battery level.
If the estimated charging time is longer than 24 hours, [Over 24hr] is displayed.
When the currently remaining Li-ion battery level exceeds each percentage level, the charging time will be displayed as [---].
When the Li-ion battery was fully charged, all the charging time information will be displayed as [---].
The currently selected electrical power (supplied to the charger).
The estimated charge level of the Li-ion battery to be reached when the remaining charging time has passed.
According to the current Li-ion battery charging status, the estimated remaining time is displayed in either of the following styles:
[Remaining Time]
The remaining charging time before the quick charge is shut off. While quick charging, it is displayed when the estimated charge level of the Li-ion battery (4) is over 80%.
[Time to 80%]
The remaining charging time before the Li-ion battery level is expected to reach 80%. While quick charging, it is displayed when the estimated charge level of the Li-ion battery (4) is under 80%. (After the charge level reaches 80%, the remaining charging time will go off, but the charging continues until the Li-ion battery is charged to a full level, or charging end time set by the charger is reached.)
The electrical power that is actually supplied while quick charging.
When charging is not performed, pushing the <OK> button on the steering wheel will switch the display to the [Charge Time Screen] menu. Select the electrical power that you wish to show in the Estimated Charge Time display.

While charging, the estimated charging time is calculated based on the electrical power that is currently supplied to the charger.
For quick charging, the estimated charging time (2) that can be displayed is up to 4.5 hours. When the estimated charging time is longer than 4.5 hours, the displayed time may differ from the actual charging time. This is not a malfunction.
The electrical power for the normal charging is displayed at a fixed value. Therefore, the displayed electrical power may differ from the one that is actually supplied.
While quick charging, the electrical power display (3) will change to the actual electrical power while charging. If the charging is stopped or the power supply is stopped (unplugged, etc.), the displayed electrical power returns to the selected electrical power.
While quick charging, the estimated charge level display (4) may increase or decrease. This is not a malfunction.
The displayed charging time on each percentage level is the current estimation, and the actual charging time will vary depending on the conditions of the vehicle or the state of charge.
While [Time to 80%] is displayed, the remaining time may differ from the time shown on the quick charger.
For [Time to 80%], the percentage cannot be changed from 80% to another value.
Right after starting or stopping charging, the estimated charging time may be differ from the actual charging time. The actual charging time will be displayed after a while.
Li-ion battery temperature gauge
The Li-ion battery temperature gauge indicates the temperature of the Li-ion battery.

If the indicator is over the normal range, the power limitation indicator light may illuminate and the power provided to the traction motor may be reduced. This is not a malfunction. Drive slowly to a safe location and stop the vehicle (preferably in a cool location). Wait until the temperature of the Li-ion battery is reduced.
The temperature of the Li-ion battery is more likely to rise in the following conditions:
When driving at high speed continuously.
When climbing hills continuously.
After performing the quick charging repeatedly.
When the outside temperature is high.
If the outside temperature is extremely low, the Li-ion battery temperature gauge may not display a temperature reading. The vehicle may not switch to the READY to drive mode.
When the temperature of the Li-ion battery is higher or lower, it may take more time to charge the Li-ion battery using a quick charger.
Li-ion battery capacity level gauge
The Li-ion battery capacity level gauge indicates the amount of charge the Li-ion battery is capable of storing.
When the capacity of the Li-ion battery decreases with age and usage, the level of the gauge will also decrease.
Audio
The audio mode shows the status of audio information.
Navigation (where fitted)
When the route guidance is set in the navigation system, this item shows the navigation route information.
Energy economy
The Energy Economy mode shows the instant energy economy and the average energy economy.
Instant energy economy:
The display changes when the energy is consumed or regenerated energy is being stored in the Li-ion battery while driving.
Average energy economy:
The display shows the average energy economy since the last reset. Resetting the average energy economy is done by pushing the <OK> button.
Energy economy history
The Energy Economy History mode shows the energy economy from the past hour by bar graph. The graph is updated every 5 minutes.
The graph continues to be updated after the power switch is placed in the OFF position and will be reset after 65 minutes.
ProPILOT Assist (where fitted)
The ProPILOT Assist mode shows the operating conditions for the following systems:
ProPILOT Assist
Lane Departure Warning (LDW)
Intelligent Lane Intervention (ILI)
Blind Spot Warning (BSW)
Intelligent Blind Spot Intervention (I-BSI)
Rear Cross Traffic Alert (RCTA)
Intelligent Emergency Braking (IEB)
This mode will also be shown when the ProPILOT Assist switch is pressed.
For more details, see
, , , , , , and .Safety shield (where fitted)
The Safety Shield mode shows the status of the following systems:
Lane Departure Warning (LDW)
Intelligent Lane Intervention (ILI)
Blind Spot Warning (BSW)
Intelligent Blind Spot Intervention (I-BSI)
Intelligent Emergency Braking (IEB)
For more details, see
, , , and Intelligent Emergency Braking (IEB) with Pedestrian Detection system.Status
This mode shows vehicle speed and audio information.
Drive Computer
The Drive Computer mode shows the following information:
Average energy consumption
Average speed
Trip odometer
Elapsed time
To reset each item or all items, push the <OK> button to switch to the Reset Menu and select a which item(s) to reset.
Chassis Control
When the Intelligent Trace Control system is operated, it shows the operating condition. See
.


